Tarping your roof is one of the finest things you can do to prevent more damage if a major storm passes through and you suspect roof damage. You have two options: hire a pro or do it yourself. If you’re feeling daring and enjoy DIY projects, this article will teach you how to properly tarp a roof using a tarp cover so that you can protect your house until the problem is fixed.
Even though a tarp on your roof is unattractive, it can effectively shield it from further harm and leaks. Unfortunately, delays in urgent roof repairs can occur when a strong storm affects a wide area. Knowing when and how to tarp your roof with a camo tarp is so crucial to safeguarding your house, especially if there is additional inclement weather forecast.
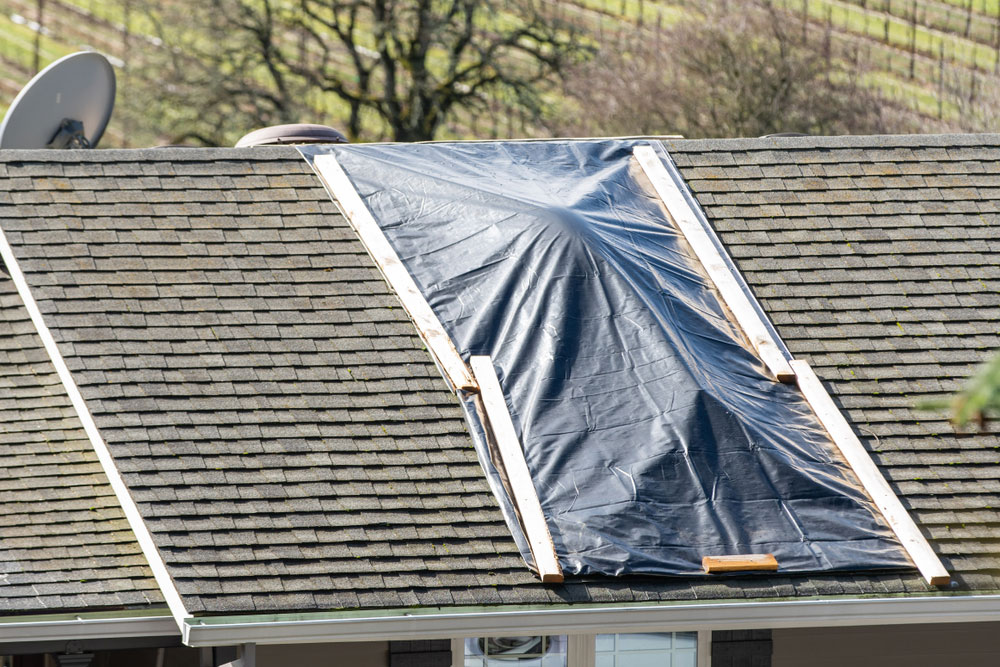
Having said that, let’s take a look at how you can tarp a damaged roof.
- Gather all the tools you will need
Here are the tools you will need to properly tarp your damaged roof:
- A tap large enough to cover the damaged area
- Plenty of lumber pieces, such as 2”x4” or 1”x4”
- A strong ladder
- A utility knife
- Measuring tape
- A roofing shovel for removing debris
- Nails/screws
- Roofing cement [optional]
- Assess the damage
Before beginning this task, make sure you have at least one assistant ready. Then, put on the proper safety gear, which includes acceptable work boots, long pants, a long-sleeve shirt, gloves, safety glasses, and fall protection gear. Install the ladder after following the necessary safety precautions. Do not climb onto any portion of the roof that appears to be damaged; instead, climb up to inspect any damage to the roof.
Determine how much of the roof has to be covered with a tarp using a tape measure, then descend to fetch a tarp of the proper size and some 2x4s to secure it. Keep in mind that the 2x4s must be long enough to protrude roughly 2 feet from the tarp’s edges.
- Remove debris and prepare the tarp
Take a broom, gather the tarp, and 2x4s, then return to the roof. remove any debris, such as shingles that are broken, that could tear the tarp or cause other harm during installation or after.
Then, enlist assistance from a helper to safely spread out the tarp over the damaged area, making sure that it extends at least 4 feet beyond the peak of the roof to stop water from seeping underneath.
Despite the fact that one person can tarp, it is not advised due to the risk of the tarp being caught in the wind and perhaps dragging the person off the roof or into a perilous situation. Additionally, having multiple people to hold down a large tarp makes it much simpler to keep it flat.
Click here – What Is Running A Train?
- Install the tarp with 2×4 lumbers
Make sure a 2×4 is placed on the tarp’s peak edge so that it sticks out from the tarp by about 2 feet. Using a hammer and nails, fasten the tarp to the 2×4, then rotate the 2×4 board 360 degrees to ensure that the tarp completely engulfs it. In strong gusts, wrapping it helps keep the nails from ripping through the tarp.
The 2×4 should be placed in the desired spot, and the tarp should be spread out and pulled tightly. The 2×4 should be screwed to the roof using a drill. To ensure that the 2x4s, shingles, and decking are all penetrated, make sure the screws are long enough. Make sure the 24 is precisely aligned, fastened with nails, wrapped, and secured by repeating same procedure with the opposing side of the tarp. To fix the tarp’s four sides, place extra 2x4s on top of the two exposed edges and screw them to the roof with wood screws.
- Fasten the tarp that overhangs under the eaves
Not every tarp will stretch over the roof’s edge. If so, secure the tarp’s that will fall over the side of the roof using a 2×4 board to ensure that it fits snugly underneath the eaves. To properly align it underneath the eaves, ask a helper to lower it. Then, wrap the 2×4 in the tarp until there is no more slack.
Screws can damage siding and shingles, which will need to be repaired, so it’s important to carefully secure the tarp. Furthermore, these repairs are not as complex as the severe water damage that may happen if the roof is not tarped.
- Secure the tarp with additional lumbers
The initial installation of 2x4s will hold the tarp in place during calm weather, but it’s recommended to add more 2x4s to sandwich the tarp between the new and existing 2x4s so that this temporary patch stands up in torrential downpours and strong winds. Put another 2×4 on top of the anchor board that is now covered in tarp and screw it to the board. Repetition of this procedure will ensure that the tarp is taut and firmly affixed to the roof even in inclement weather.
Sandwiching the tarp on the overhang anchor board is especially wise. If it is not secured as tightly to the roof and side of the house as possible, this overhang is frequently the first to tear off in strong winds. Remember that if you believe the tarp is still lose, you can add more 2x4s. You give even support across the top of the tarp, just make sure to spacing the boards out properly.
Wrapping up
You may save your property from thousands of dollars’ worth of water damage, mold, and mildew growth, by tarping your roof. Early detection of issues, prompt inspection, and completion of the required roof repairs will help you survive until a roofing expert can assist. If you don’t make these urgent repairs, your insurance provider c
Do roof tarps cover up damaged roofs?